Buzzlineman is reader supported. If you purchase after clicking the affiliate links, I’ll earn some money- maybe even enough to buy me a new pair of work gloves. You do not pay a higher price.
We work and frame hundreds, probably thousands, of poles throughout our lineman careers. However not every pole is the same and different situations need specific framing. In this article you will learn the 5 most common pole framing options fiber optic lineman use and the tools they need to do it. I should mention there are multiple ways to make some frames and I will go over how I choose to do mine and what works for me.
There are a few pole framing situations that get used most often, but knowing each frame and when to use it is important to get the job done correctly. Let’s go over these frames discussing what these pole frames consists of, how to install them, and a few tips to help.
The Most Common Lineman Frames
Here’s the frames you need to know as a fiber lineman. Learn them well since you will use them so often. Experience is key here.
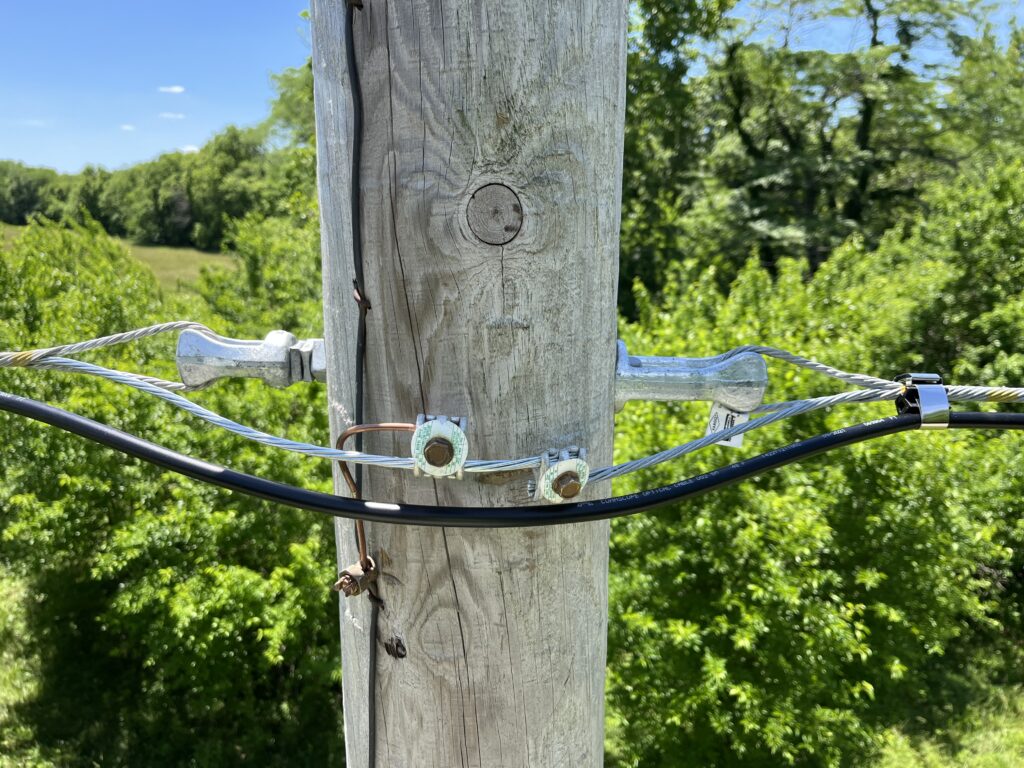
Straight Through Frame
This is going to be the frame we use the most often. It’s used when the pole is in a straight line and the 3 bolt straight clamp is used. The hardware you need for this frame includes:
- Bolt
- Washer (2)
- Lock Nut (2)
- Straight Clamp
- Lock Nut
- Copper Bond & Weaver
Insert the bolt from the back of the pole, with a washer. From the front add another washer and then a lock nut. Tighten down the lock nut. Open up your straight clamp, put the strand in the straight clamp and finger tighten the 2 smaller nuts. Slide the straight clamp onto your bolt and then add 1 more lock nut (finger tighten this one also).
Now you are ready to tighten the guy wire (strand). Once it’s where you want it (close to neutral) tighten down your 3 nuts on the straight clamp. Add the lock nut in front of the square nut. Now all you need to do is add your copper bond, copper, and weaver.

Curve Pole Frame
The curve pole is very similar to a straight through pole, but it is used when their is an angle or curve in the pole line. It’s apparent because their is usually already a power down guy/ anchor that you need to attach to. Instead of a 3 bolt straight clamp, you need a 3 bolt curve clamp. This is what you need for a curve clamp frame:
- Bolt
- Pig Ear/ Guy Attachment
- Washer
- Square Nut
- Curve Clamp
- Lock Nut
- Preform
- Down Guy Strand
- Copper Bond & Weaver (2)
Put the pig ear on the bolt, facing the anchor, insert from behind the pole; much like the straight through frame. Then add your washer and square nut on the front. Tighten the square nut. Curve clamp and strand with another square nut. Then you tighten the line, tighten your square nut and other nuts on the curve clamp.
Now it’s time to finish that down guy attachment. People do this next step in different ways, but here’s how I like to do it and I will briefly explain why afterwards. Grab your down guy strand and bring one end of it next to your clamp, on the correct side of the pole (look up). Attach your down guy strand to your other strand with a weaver, an inch away from your clamp. This part is a bit tricky and is one of those times you wish you had another hand 😂.
After you get it, add your preform to your pig ear and grab that strand and pair it with that preform. Now just do up your copper bond and that’s it.
Dead End Frame
Anytime the pole line ends or does a 90 degree angle, a dead end frame will be needed. It is paired with an anchor/ down guy. For this frame you could choose to use a thimble eye bolt, but I choose not to. What you will need includes:

- Bolt
- Slip Eye
- Pig Ear/ Guy Attachment
- Square Nut
- Lock Nut
- Preform
- Copper Bond & Weaver
I use a “quickie” to suck up dead end poles. It’s a part of hardware from an auxillary eye that we use for down guys. If you give this quickie method a try make sure you don’t let it take the place of your preform!
Drill your hole, put the bolt and slip eye through the front side, then the pig ear, square nut, and lock nut on the backside. In order to get your strand ready to be sucked up you’ll need to get your strand prepped in the quickie, like the picture above. In order to do this you’ll need to take the nuts off the quickie, remove the big piece that has a groove in it, then slide your strand into the U bolt and reassemble everything you just dissassembled, just in reverse order. Now it’s ready to be tightened.
After the line is tight and you’ve completed the preform, its time for the down guy side of the frame to be finished. This can be completed 2 different ways- using the same strand that was used for the line or by using a separate piece of strand. If you’re going to use a separate piece of strand the only difference will be the continuity bond, which is used to join 2 different lines together with a weaver. In that case I like to do my continuity bond BEFORE I work on the preform.
After you get that done all you need to do is your copper bond. When more than one weaver is used on a pole it’s best to butt them up next to each other.
Straight Through With Screw Eye, Pig Ear, Slip Eye
This is actually 2 different frames, but they are so similar I included them together. I don’t like using this type of frame, but a lot of projects want us to do as much as possible on 1 frame. It has 2 different variations- deadend anchor or continuous with slip and screw eyes. Honestly, I’d rather do a continuity bond on 2 frames instead.
This frame allows you to have strand going 2 opposite directions, but on 1 frame. It’s a straight through pole that has a screw eye attached so another line can meet at that pole. On the other end of the pole and screw eye is either a guy hook or slip eye, depending on the plans for those pole lines. I mentioned above, it can either be a deadend with a down guy or it can be a continuous frame with a screw eye on one side and a slip on the other. We’ll cover both frames below. The hardware includes:
- Bolt
- Guy Hook/ Pig Ear (deadend)
- Slip Eye (double deadend)
- 2 Washer
- 2 Square Nut
- 1 Lock Nut
- 1 Thimble Eye Nut/ Screw Eye
- Copper Bond & Weaver
- Possibly more square nuts & lock nuts
The first scenario is a straight through with a dead end anchor. Prep the back side of the pole for the anchor with the pig ear then slide the bolt through and proceed just like you would with a straight through clamp frame. The only thing you want to be conscious about is to make sure you leave enough length of bolt for your screw eye.
A tip I have for you about this part is relevant if you have excess bolt exposed and need to get your screw eye tight. Now I should mention that on my current project the spec is 2.25 inches of exposed bolt. So if you need to get close to that to make sure you have enough for your screw eye, but you’ll need to make sure that screw eye is tightly screwed down.
Alright, back to the tip. I try to make sure my screw eye has 4 threads of the bolt coming through. You want to make sure you don’t screw it down too far or you won’t be able to get your preform through the eyelet. In order to get this perfect fit I use another square nut or both a square nut and a locknut, depending on how much excess bolt I’ve got. Make sure they are tight to each other, I’ll use my bell wrench and channellocks. Then tighten down your screw and it’s ready to take on the extra strand line.

The slip eye variation of this frame has the same concept going on except swap the pig ear for a slip eye. This slip eye is used when the strand keeps getting built that direction. Put the preform in the slip eye, make sure you do connect your tails, if you need to, and keep on going. This is an intersection pole and is framed to allow opposite directions of strand to be built. It’s a busy frame, but once you do a few of them you’ll figure it out pretty quickly.
Which Frames Use Pole Guying/ Down Guys
The poles that use pole guying (I like to call them down guys) are dead end poles, and curve poles. Usually you’ll just have 1 down guy for each situation/frame, but we do across poles that need 2 separate down guys, just feet apart from one another. I don’t understand it, but power does it so we do it.
That’s tip #2- if you’re ever in doubt look up. Check out how power framed that pole and that’s a pretty good guess of how you should frame that pole also. HOWEVER, each project is different.
The Tools you Need for Pole Line Construction

First we’ll go over the bare bones tools you need to get the job. You’re going to need:
- A drill and an auger bit for drilling holes in the poles
- Lineman pliers or nines for cutting copper wire bonds
- Channellocks for split bolt installation and weavers
- Bell wrench for tightening nuts
There you go, 4 tools and you can do it all. I do recommend a few other small tools to make the job a bit easier, because we don’t have 3 hands. So for just a few more bucks you can save yourself a ton of frustration by picking up a 1/2 wrench and nut driver. Depending on the situation sometimes I prefer the nut driver over the wrench, but they are both better options than channellocks.
One more thing I recommend is an accessory for the drill. The side handle. I love this thing. It helps keep the drill where you want it, especially when you hit a knot in the pole. I also find myself using it when the auger bit gets tight in the pole. This usually happens on new poles and when it does the side handle helps you pull hard as you try to get the auger bit out of the pole.
Final Words
There are more frames to know for the job, but if you know these 5 frames you’ve got a good idea how to frame a utility pole. I’ll finish this article with tip #3- check the maps. You should always have access to the building maps that have the utility pole lines you’re working on. When you come to a pole that looks like it could get built for another line, check the maps and make sure you frame it correctly. If not, you might find yourself coming back and fixing the frame, which is good practice for your hoist and cable grip skills…

Here’s another article that has more useful information about installing strand and some of the best bell wrenches I use and recommend- The 5 Best Lineman Bell Wrenches.