Buzzlineman is reader supported. If you purchase after clicking the affiliate links, I’ll earn some money- maybe even enough to buy me a new pair of work gloves. You do not pay a higher price.
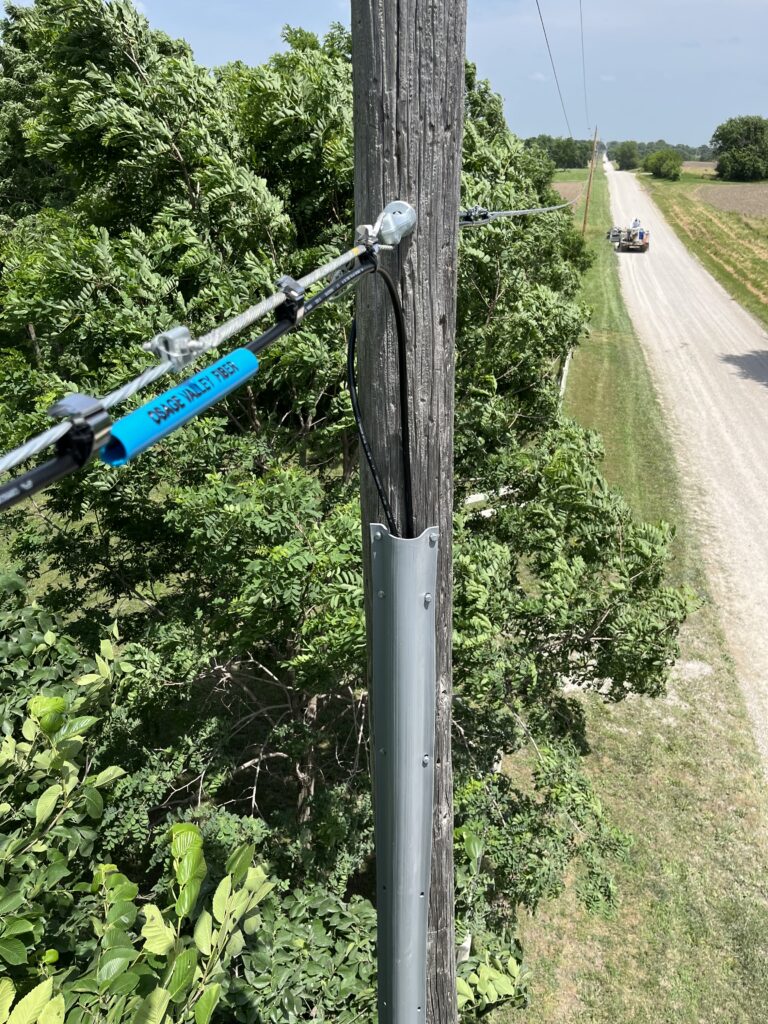
U guard, riser guard, riser….these are all terms we use to identify this hard plastic cable protector. It keeps the fiber nice and safe. Below I’ll touch on how lineman install u guards on riser poles in 5-10 minutes. After you’ve done a few of these riser guard installs you’ll have a proven system and enough experience to really start hummin’ along.
I’ll touch upon a few little tricks that have helped me develop a process that works for me and I’ll also go into more detail about measuring, drilling, and cutting u guards for riser poles.

How to Install a Riser Guard
- Use your tape measure to measure 18 inches down from your frame or wire. Use something to mark that spot, I tend to use either the tape measure or my nines (lineman pliers).
- Load a screw in your drill, and one in your mouth, just in case. Put your drill back to the side and grab your riser guard (I like to hang mine off the bucket/arm). Now hold the riser guard with one hand, align the top with that mark you made earlier and put in the first screw at the top hole. Install most of your screws being mindful how far you are from the ground.
- While drilling your lag screws you need to think about your distance from the ground. Because at 12 feet from the ground is where the bottom of the riser guard needs to be. It really just depends on the pole as to when you will need to put up additional riser guards or cut your riser guard at the 12 feet mark. Of course you can’t efficiently cut a u guard without a saw. Here’s a solid budget option, Craftsman 12 in Handsaw, that has cut hundreds of riser guards for me and still works as good as the day I bought it.
- All that is left is to make a coil with the fiber coming out of the riser guard. Make it look pretty with black electrical tape. Some projects have you do more work such as securing the coil to the pole with mule tape or more black tape. Grab your numbers from your fiber coil and you’re done with that riser pole!
After you get a few riser guards installed you’ll start to notice things you can do to speed the process along or make it easier on yourself. Below I go into more detail about some of the steps we discussed above.

Measure Twice Cut Once
Have a tape measure nearby so you can consistently measure your 18 inches. Once you’ve measured enough you’ll get a pretty good idea of where that 18″ is, but I still measure every time. I like to use a tape measure that will also allow me to easily read 60 inches for poles that need framed at 60 inches from cross arms.
We discussed the 12 feet from the ground measurement earlier. Measuring 12 feet to the ground can be a struggle if the wind is blowing, you don’t have a long enough tape, and other things. For these reasons I use a specific tape measure that easily reaches the ground from 12 feet and can withstand my contraption of a slip eye and electrical tape (more on this below).
I’ve went through a lot of tape measures, they always end up tearing, BUT I have found the one that can withstand our line of work and the only 1 I recommend- Milwaukee 16 ft Anti-Tear. The reason they tear is because I tape a slip eye to the end of the tape so I can drop the slip eye down to the ground to get my 12 foot measurement. Without the slip eye the tape will blow in the air, so you won’t be able to get an accurate measurement without a helper. It works great, just make sure you get an anti tear tape measure.
There are 3 situations that can happen with the bottom of the riser guard:
- It measures exactly 12 feet from the ground (extremely rare)
- It needs to be cut
- It needs additional riser guard
Both 2 and 3 happen often. Nearly every time you do a riser pole.
Let’s start with scenario 2, the riser guard needs to be cut. By the time you get to the bottom of the riser guard you will have installed most of the lag screws. You don’t want to install all of them or you won’t be able to pull the fiber to the side, safely out of the way of your saw. Use the tape measure to get the 12 foot measurement, mark the spot with the lineman pliers or whatever works best for you. After that pull the fiber out of one side of the riser guard and use the saw to cut the excess riser guard off.
Once you get it cut where you need to place the fiber back within the riser guard and finish your final few lag screws, making sure you have 2 screws at the bottom.
Now for riser guard situation 3, you need additional riser guard. The only aspect that changes here is how to add an additional piece of riser guard. Before I go up to work the pole I will take a quick glance and guess if I will need addtional u guard. If so I will either take 2 full u guards, or I will take a scrap piece that is long enough. You will most likely be cutting the 2nd piece of riser guard.
One tip have for installing the extra piece is to install it on top of the first riser guard. We do it this way to make it easier for fiber lines that will be using this riser guard later on. Some poles will have multiple fiber tails using the same riser guard and you will need to shove the tail all the way down the riser guard and if you install the 2nd piece of riser guard UNDER the first the fiber tail will often get caught at that intersection point of the 1st riser guard and 2nd. However if you install the 2nd riser guard on top of the 1st riser it is a smooth transition on the inside of the riser.
I must say, installing the 2nd piece of riser guard on top is more work. The lag screws don’t always line up perfectly with the designated lag screw holes so you will need to drill them through the plastic of both pieces, which makes it harder. Nonetheless, it’s the right way to do it to save frustration for the next guy later on.
Why I love this Impact Drill

There’s 2 ways to put in lag screws, with a hammer or a drill. I recommend 1- the drill. Most risers are going to have at least 16 lag screws, so I STRONGLY recommend using an impact drill. I’ve hammered lag screws in before, seen others do it, and I don’t recommend it. Thank goodness for modern tech, hammering in 16, hell sometimes even 40 lags on 1 pole is a nice little workout.
Imagine doing this 6 or 7 times in a day, consistently. Get the drill. The one I use works great- this DeWALT Cordless 1/4 in Driver. You’ll also want to grab this nut driver set for the thousands of lag screws you’re gonna install. Like many aspects of installing strand and fiber, you never have enough hands so I like having a magnetic nut driver.
Why U Guards are Important
These u guards, riser guards or whatever you want to call them are vital to keeping the fiber secure to pole and safe from falling tree branches, woodpeckers, farm equipment, and such. Without the riser guard there would be over 30 feet of fiber exposed on the pole. So these u guards do serve a vital purpose on our utility poles.

Final Words
Installing u guards on utility riser poles in an important aspect to a fiber lineman’s every day work. If you follow these few steps you’ll have a pretty good hang of the riser guard install process and feel confident that each riser guard that is installed is done correctly (follow your project’s spec book). Installing these riser guards from the bucket is preferable and in a different article I will explain how to install these riser guards on hooks…they suck. If you are looking for some new hooks/gaffs check out this article where I went into detail about the best options on the market- The Best Lineman Pole Climbing Gaffs.